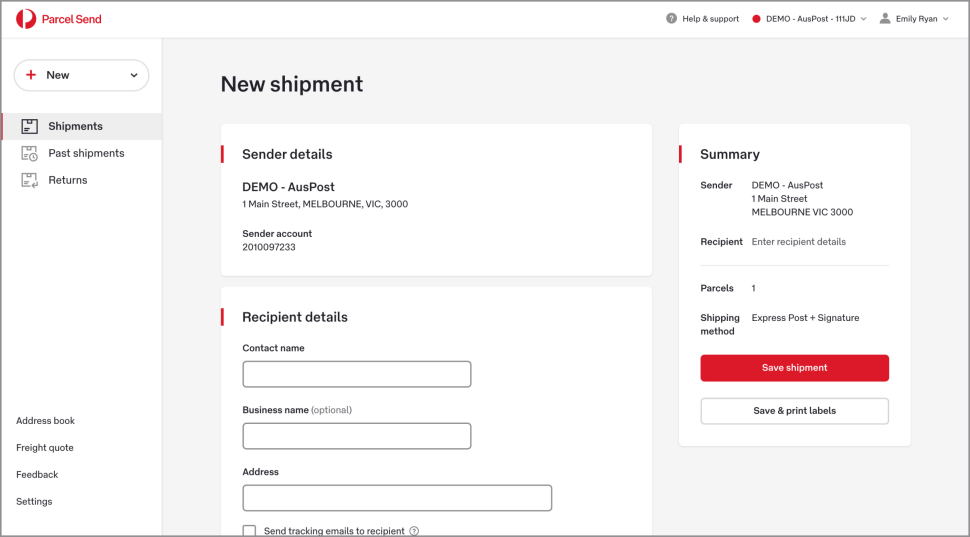
Your Sender details show which account will be billed, and the address the shipment is being sent from. This account has no alternative business details, so there is no drop down menu.
PUBLISHED 3 MARCH 2021
Creating and sending a shipment with Parcel Send has four main steps. Each step is explained in more detail below.

Your Sender details show which account will be billed, and the address the shipment is being sent from. This account has no alternative business details, so there is no drop down menu.
3. Enter the recipient details.
4. Enter any Delivery instructions and references. These will be printed on your label.
5. Enter your parcel details. If you have more than one parcel type, click Add another parcel.
Tip: If you’re sending more than one parcel with the same packaging type, weight and dimensions, go to Settings > Preferences and turn on Parcel quantity. This lets you enter the details for one parcel, and then specify how many identical parcels you’d like to add to the shipment.
6. Specify whether or not your shipment contains dangerous goods.
7. Enter the amount of Transit cover you’d like for this shipment.
8. Choose your shipping method.
9. Click Save shipment. Your saved shipment will appear on the Shipments page in the Prepare & Print tab.
Tip: If you’re ready to print your labels, click Save & print labels. Once you print your label your shipment will appear on the Shipments page in the Ready to Despatch tab.
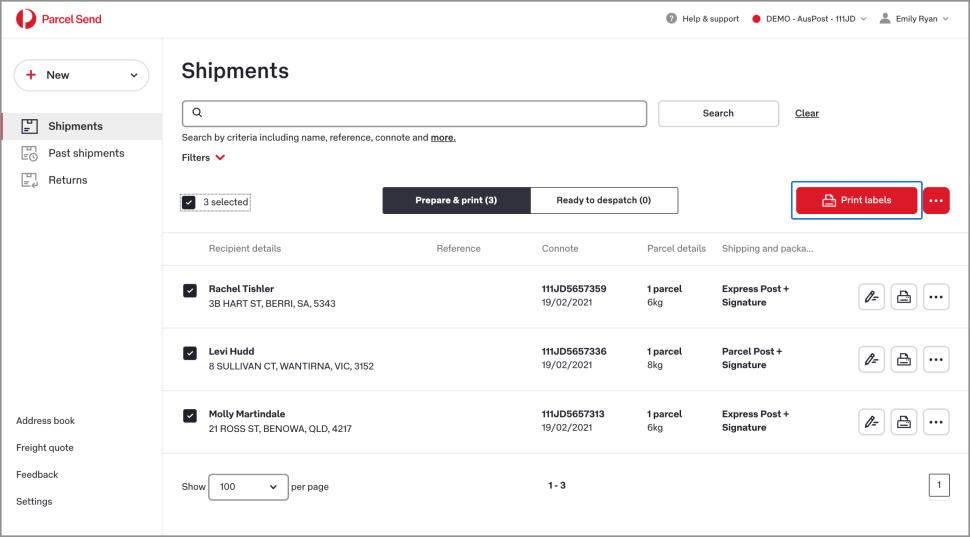
Once you‘ve selected the shipments you want to print, click Print labels.
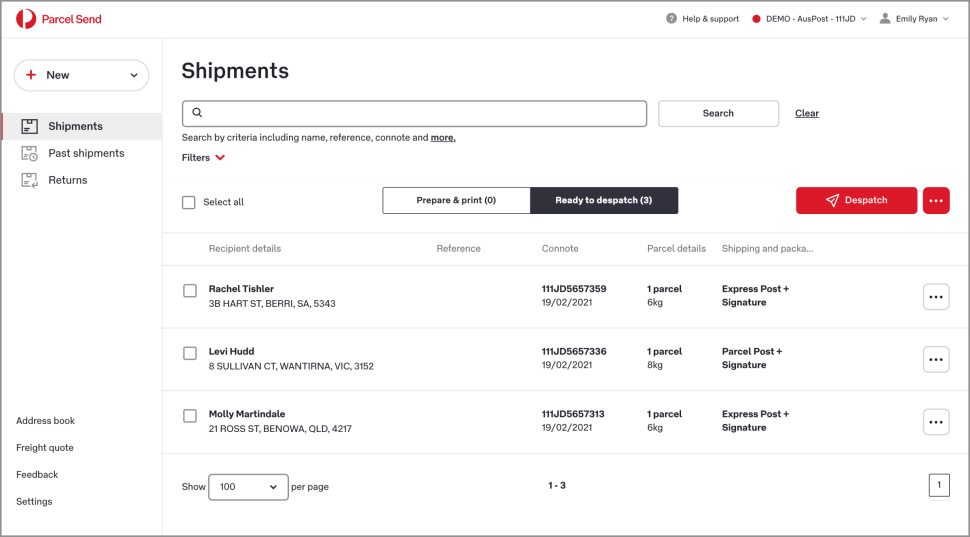
Once you’ve printed your labels, the shipments are moved to the Ready to despatch tab.
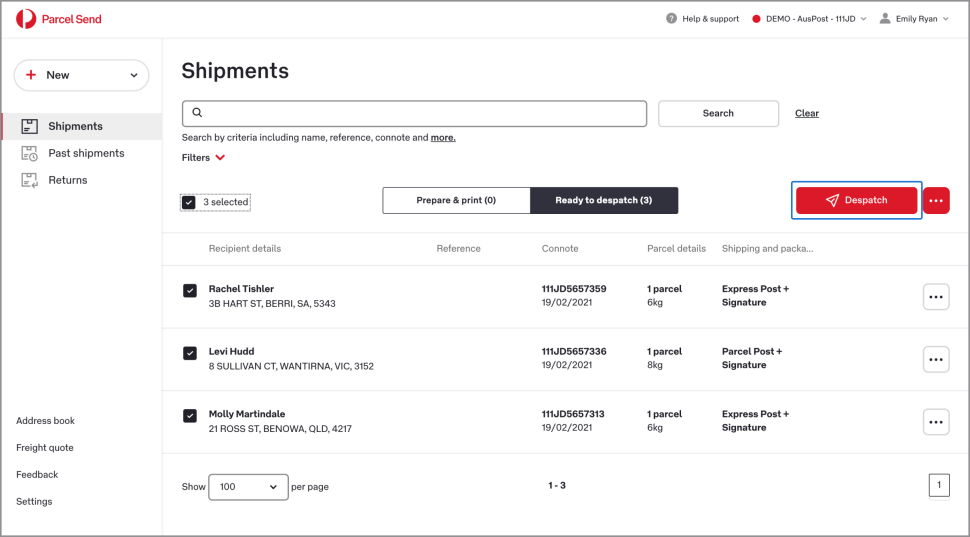
Once you‘ve selected the shipments you want to despatch, click the Despatch button.
3. Check that all the details in your despatch summary are correct, then click Manifest & print to print your Manifest summary (called an Order Summary Report).
Once you print your Manifest summary, your shipment is moved to Past shipments.
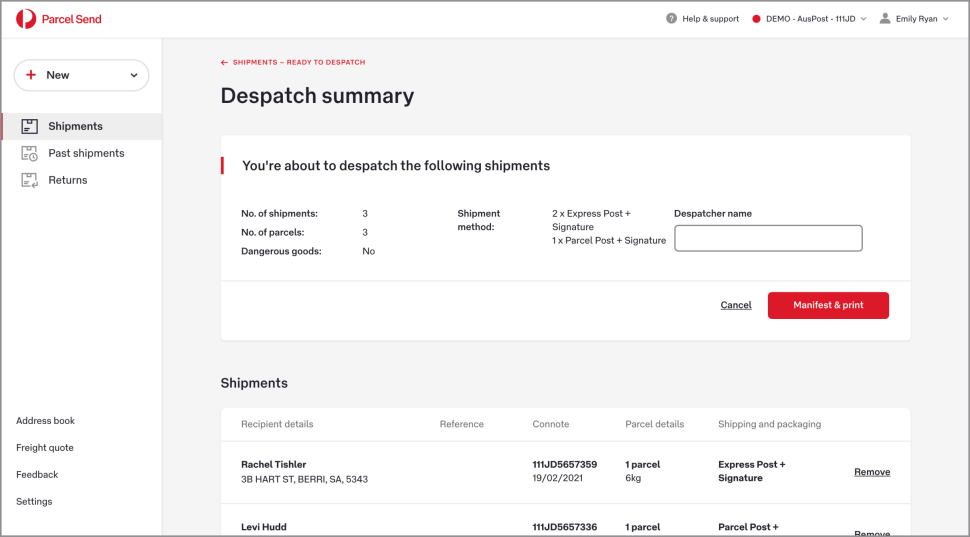
The Despatch summary page shows you a summary of the shipments you’re about to manifest.
To reprint a manifest summary:
You’ve told Parcel Send that you’re despatching your shipment, now you’re ready to physically despatch it.
Attach your labels securely to your parcels, and make sure to include your manifest summary with your shipment.
Depending on your contract and your business you can either:
Creating and sending a shipment with Parcel Send has four main steps. Each step is explained in more detail below.
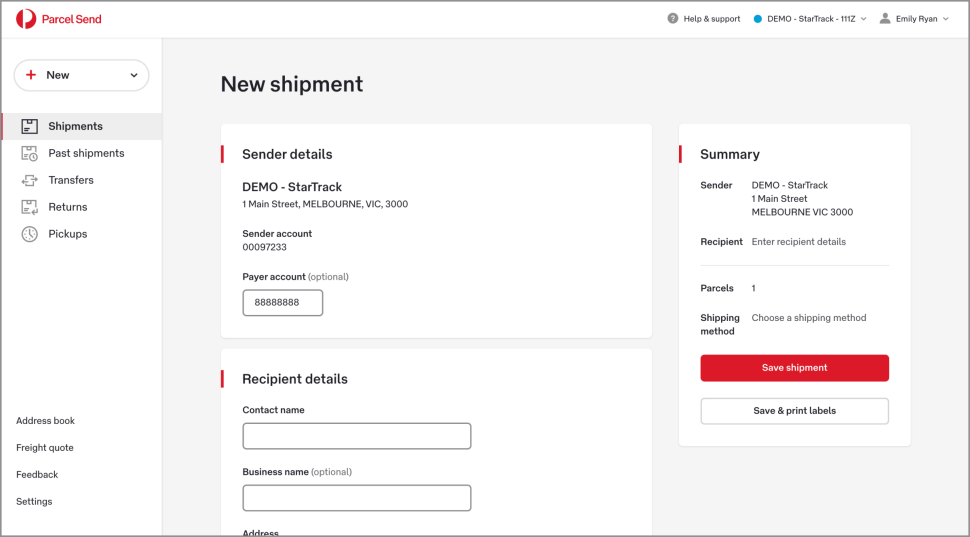
Your Sender details show which account will be billed, and the address the shipment is being sent from. This account has no alternative business details, so there is no drop down menu.
The sender account is charged by default. You can charge the cost to a different billing account linked to your account, or a different StarTrack account. Click Use different payer account and enter payer’s 8-digit account number
3. Enter the recipient details.
4. Enter any Special instructions and references. These will be printed on your label.
5. Enter the amount of Transit warranty cover you’d like for this shipment.
6. Enter your parcel details. If you have more than one parcel type, click Add another parcel.
Tip: If you’re sending more than one parcel with the same packaging type, weight and dimensions, go to Settings > Preferences and turn on Parcel quantity. This lets your enter the details for one parcel, and then specify how many identical parcels you’d like to add to the shipment.
7. Specify whether or not your shipment contains dangerous goods.
8. Choose your shipping method.
9. Click Save shipment. Your saved shipment will appear on the Shipments page in the Prepare & Print tab.
Tip: If you’re ready to print your labels, click Save & print labels. Once you print your label your shipment will appear on the Shipments page in the Ready to Despatch tab.
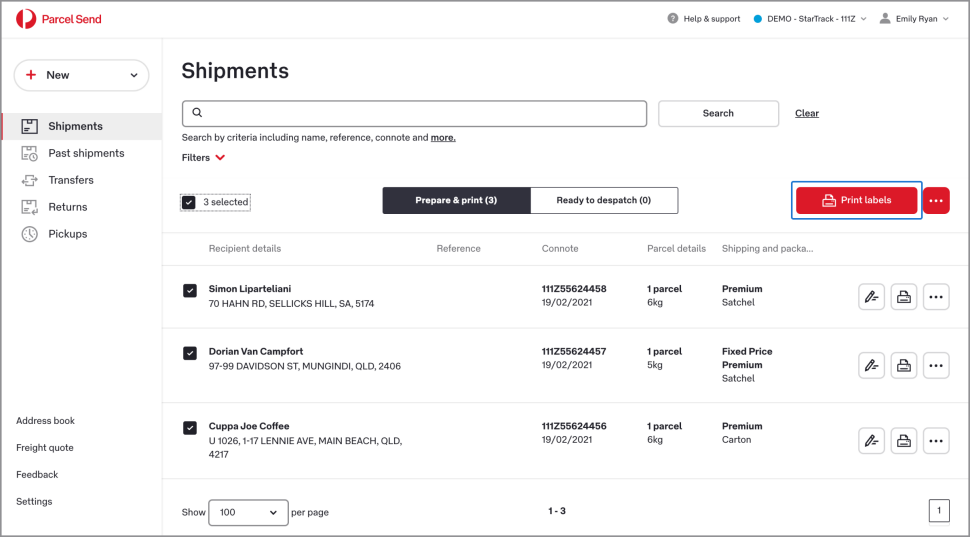
Once you’ve selected the shipments you want to print, click Print labels.
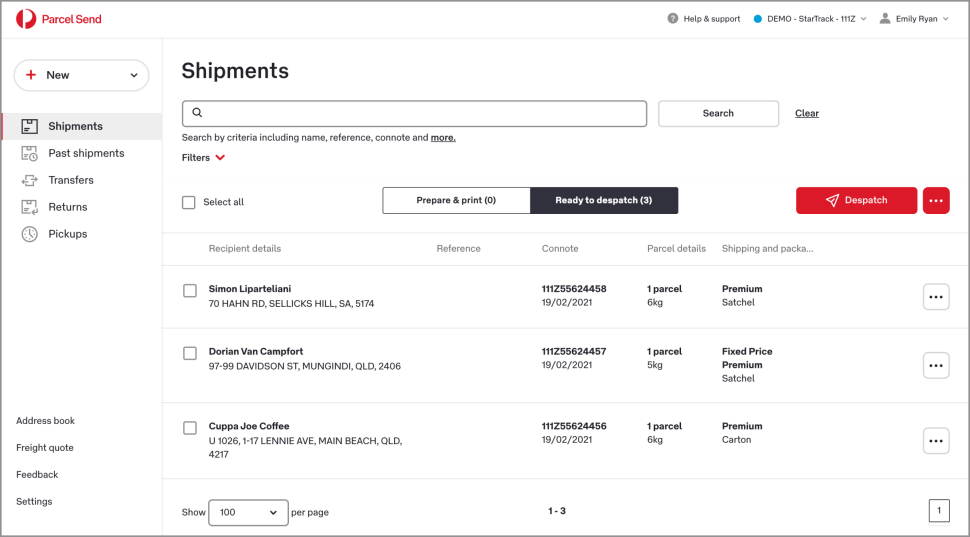
Once you’ve printed your labels, the shipments are moved to the Ready to despatch tab.
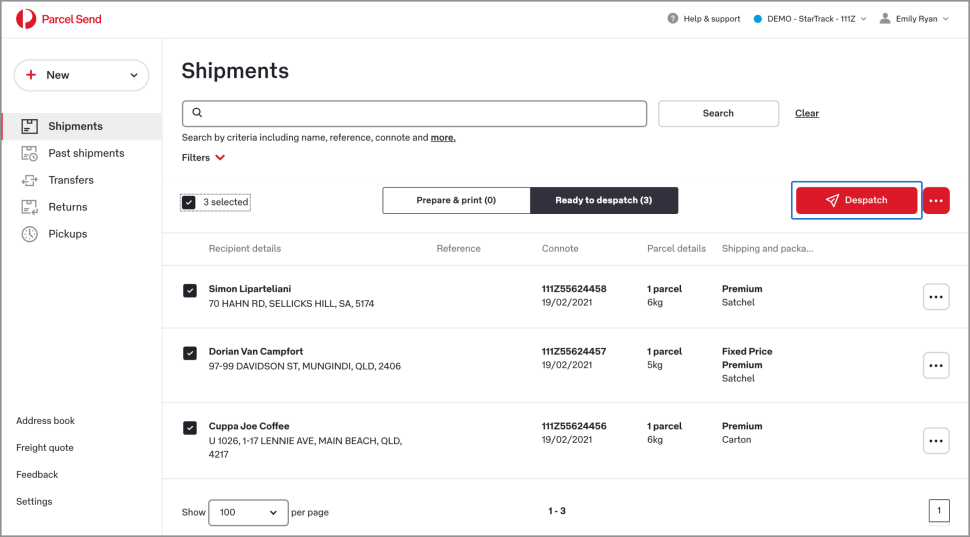
Once you’ve selected the shipments you want to despatch, click the Despatch button.
3. Check that all the details in your despatch summary are correct, then click Manifest & print to print your Manifest summary (called an Order Summary Report).
Once you print your Manifest summary, your shipment is moved to Past shipments.
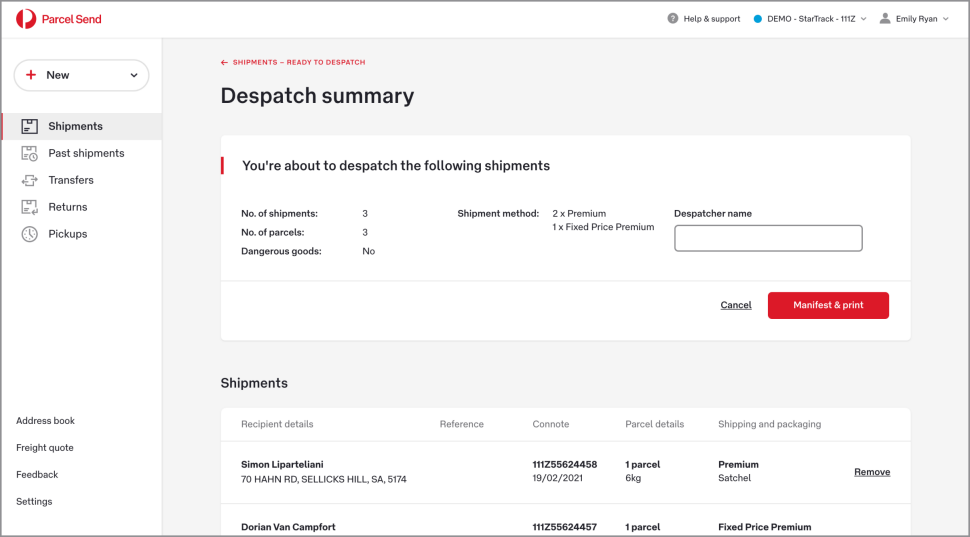
The Despatch summary page shows you a summary of the shipments you’re about to manifest.
To reprint a manifest summary:
You’ve told Parcel Send that you’re despatching your shipment, now you’re ready to physically despatch it.
Attach your labels securely to your parcels, and make sure to include your manifest summary with your shipment.
Depending on your contract and your business you can either:
Creating and sending a shipment with Parcel Send has four main steps. Each step is explained in more detail below.
| Shipping method | Availability for business days (non-public holidays) and Saturday |
|---|---|
| Now / Now ID | Mon – Fri before 2pm |
| Afternoon / Afternoon ID | Mon – Fri before 11am |
| Tonight / Tonight ID | Mon – Fri before 3pm |
| Saturday / Saturday ID | Saturday before 11am |
8. Click Save shipment. Your saved shipment will appear on the Shipments page in the Prepare & Print tab.
Tip: If you’re ready to print your labels, click Save & print labels. Once you print your label your shipment will appear on the Shipments page in the Ready to Despatch tab.
To reprint a manifest summary:
You’ve booked a pickup and told Parcel Send that you’re despatching your shipment, now you’re ready to physically despatch it.
Attach your labels to your parcels and wait for your pickup driver to arrive. Make sure to give the manifest summary to the driver.
We read your feedback and use it to improve the help pages for our Parcel Send platform.
Australia Post acknowledges the Traditional Custodians of the land on which we operate, live and gather as a team. We recognise their continuing connection to land, water and community. We pay respect to Elders past, present and emerging.